MariaDB Galera Cluster with HA Proxy and Keepalived on Centos 6
Internally we run 2 MySQL Master Master replication servers. While we have had no problems with them managing them is an absolute nightmare. Adding new databases and users is painful. I decided to create a test MariaDB Galera cluster to see if that solves our issues.
I am far from a database expert and had a couple of hiccups on the way getting things working the process is relatively painless (In comparison to MySQL)
For a test we are running 2 Centos 6.5 64bit Virtual Machines. DB1 at 192.168.1.61 and DB2 at 192.168.1.62. We will use 192.168.1.60 as the Virtual IP for the cluster so that software that doesn’t support talking to multiple servers can still have redundancy.
NOTE: In the real world you need more than 2 servers otherwise a failure of one server causes the other to also go offline as the cluster no longer has quorum. You can bring back up the good server by re-bootstrapping the node.
The first steps apply to both servers.
Add the MariaDB repo to yum. If you are 32bit then replace centos6-amd54 in the base url with centos6-x86
[root@DB1 ~]# vim /etc/yum.repos.d/MariaDB.repo
[mariadb]
name = MariaDB
baseurl = http://yum.mariadb.org/5.5/centos6-amd64
gpgkey=https://yum.mariadb.org/RPM-GPG-KEY-MariaDB
gpgcheck=1
Install the required MariaDB packages. In Centos 6 there is a dependency issue that has mysql-libs already installed. Trying to remove it will also remove postfix and crontab so we use rpm –nodeps to get around having to remove it
[root@DB1 ~]# rpm -e --nodeps mysql-libs
[root@DB1 ~]# yum install MariaDB-Galera-server MariaDB-client galera -y
Next we need to install xtrabackup. When a server comes online with MariaDB it contacts a server already in the cluster to get the latest copy of the data. While you can use rsync or mysqldump to do it it does cause locking issues that will make the source server bcome read only while the new server gets a copy of the data. To prevent this we use xtrabackup
[root@DB1 ~]# rpm -Uhv http://www.percona.com/downloads/percona-release/percona-release-0.0-1.x86_64.rpm
[root@DB1 ~]# yum install percona-xtrabackup nc -y
Next edit the MariaDB configuration file
[root@DB1 ~]# vim /etc/my.cnf.d/server.cnf
[mysqld]
datadir=/var/lib/mysql
query_cache_size=0
binlog_format=ROW
default_storage_engine=innodb
innodb_autoinc_lock_mode=2
wsrep_provider=/usr/lib64/galera/libgalera_smm.so
#wsrep_provider=/usr/lib/galera/libgalera_smm.so //32 Bit
wsrep_provider_options="gcache.size=1G"
wsrep_cluster_address=gcomm://192.168.1.61,192.168.1.62
wsrep_cluster_name='cluster1'
wsrep_node_address='192.168.1.61'
wsrep_node_name='db1'
wsrep_sst_method=xtrabackup
wsrep_sst_auth=username:Password
The main items to take note of are: - wsrep_provider – If you are running on 32bit it will be in the /usr/lib otherwise on 64bit systems it will be in /usr/lib64 - wsrep_cluster_address – Include all the addresses of the servers that will exist in the cluster. You can use hostnames if you wish - wsrep_cluster_name – This is the name of the cluster. All servers in the cluster must match names - wsrep_node_address – The IP address of this server - wsrep_node_name – The name of this server - wsrep_sst_auth – This is the username and password used to authenticate xtrabackup. Set this the same on all machines
Start MySQL on the first server. We need to bootstrap the first server to create the cluster so instead of passing it start we pass it the argument bootstrap
[root@DB1 ~]# /etc/init.d/mysql bootstrap
Bootstrapping the clusterStarting MySQL.... SUCCESS!
If it doesn’t start then you can find debugging information in /var/lib/mysql/
Once MariaDB is up and running you can now run mysql_secure_installation to set the root password.
[root@DB1 ~]# mysql_secure_installation
You should now be able to access MariaDB using the mysql client. You are going to want to allow the root user to login from anywhere.
[root@DB1 ~]# mysql -u root -p
Enter password:
Welcome to the MariaDB monitor. Commands end with ; or \g.
Your MariaDB connection id is 5
Server version: 5.5.34-MariaDB-wsrep MariaDB Server, wsrep_23.7.6
Copyright (c) 2000, 2013, Oracle, Monty Program Ab and others.
Type 'help;' or '\h' for help. Type '\c' to clear the current input statement.
MariaDB [(none)]> use mysql
MariaDB [mysql]> update user set host='%' where user='root' and host='localhost';
Query OK, 1 row affected (0.00 sec)
Rows matched: 1  Changed: 1  Warnings: 0

MariaDB [mysql]> flush privileges;
Query OK, 0 rows affected (0.00 sec)
The next step is to bring up another server in the cluster. Edit the MariaDB configuration file as you did the first server however make sure you change the values for wsrep_node_address and wsrep_node_name
[root@DB1 ~]# vim /etc/my.cnf.d/server.cnf
You should now be able to start MariaDB on the server
[root@DB2 mysql]# /etc/init.d/mysql start
Starting MySQL..... SUCCESS!
If you run into any problems don’t forget to check the log at /var/lib/mysql/
Both servers should now be up and running. As a test create a database on one server and ensure it appears on the other.
[root@DB2 mysql]# mysql -u root -p
Enter password:
Welcome to the MariaDB monitor. Commands end with ; or \g.
Your MariaDB connection id is 5
Server version: 5.5.34-MariaDB-wsrep MariaDB Server, wsrep_23.7.6
Copyright (c) 2000, 2013, Oracle, Monty Program Ab and others.
Type 'help;' or '\h' for help. Type '\c' to clear the current input statement.
MariaDB [(none)]> show databases;
+--------------------+
| Database |
+--------------------+
| information_schema |
| mysql |
| performance_schema |
+--------------------+
3 rows in set (0.01 sec)
MariaDB [(none)]> create database test;

[root@DB1 ~]# mysql -u root -p
MariaDB [(none)]> show databases;
+--------------------+
| Database |
+--------------------+
| information_schema |
| mysql |
| performance_schema |
| test |
+--------------------+
4 rows in set (0.00 sec)
Now that the cluster is up and running it is time to get HA Proxy working.
As we will be running HA Proxy on the database servers themselves we need to change the port that MariaDB listens on so that HA Proxy can listen on that port. The default port is 3306 we are going to change it to 3307. If you are running seperate HA Proxy servers you can skip this step.
Edit the MariaDB configuration file and below the mysqld heading add the line port=3307
[root@DB1 ~]# vim /etc/my.cnf.d/server.cnf
[mysqld]
port=3307
Do this on both servers. You will need to restart both servers however make sure that you do one at a time otherwise you will have to start one of the servers using the bootstrap argument
[root@DB1 ~]# /etc/init.d/mysql restart
Shutting down MySQL.... SUCCESS!
Starting MySQL..... SUCCESS!
[root@DB1 ~]# netstat -tunap | grep mysql
tcp 0 0 0.0.0.0:3307 0.0.0.0:* LISTEN 7534/mysqld
tcp 0 0 0.0.0.0:4567 0.0.0.0:* LISTEN 7534/mysqld
tcp 0 0 192.168.1.61:35187 192.168.1.62:4567 ESTABLISHED 7534/mysqld
Next we need to create a couple of users that HA Proxy will use to check MariaDB is running. The check is fairly basic it just checks that a user can login then closes the connection.
[root@DB1 ~]# mysql -u root -p
MariaDB [(none)]> CREATE USER 'haproxy'@'192.168.1.61';
MariaDB [(none)]> CREATE USER 'haproxy'@'192.168.1.62';
MariaDB [(none)]> FLUSH PRIVILEGES;
Change the IP addresses to those of either your HA Proxy servers if you are using them or if like me you are running HA Proxy on the MariaDB servers themselves set it to those IP’s. HA Proxy doesn’t support password authentication so it will only accept logins from the IP’s you list and has no privileges anyway.
The configuration for both HA Proxy servers is the same. First install it. It is available from the base repositories
[root@DB1 ~]# yum install haproxy -y
The default config file is full of useless configuration so just move it to keep as a backup and create a new file
[root@DB1 ~]# mv /etc/haproxy/haproxy.cfg /etc/haproxy/haproxy.cfg.bak
[root@DB1 ~]# vim /etc/haproxy/haproxy.cfg
Our configuration looks like:
global
log 127.0.0.1 local0 notice
user haproxy
group haproxy

defaults
log global
retries 2
timeout connect 1000
timeout server 5000
timeout client 5000

listen mariadb-cluster
bind 0.0.0.0:3306
mode tcp
option mysql-check user haproxy
balance roundrobin
server DB1 192.168.1.61:3307 check
server DB2 192.168.1.62:3307 check

listen webinterface
bind 0.0.0.0:8080
mode http
stats enable
stats uri /
stats realm Strictly\ Private
stats auth Username:Password
The main things you are going to need to change are the IP addresses of your servers. We have also enabled the status interface. If you don’t want to enable it then don’t add everything after listen webinterface. You can change the auth username and password by changing the stats auth line.
[root@DB1 ~]# chkconfig haproxy on
[root@DB1 ~]# /etc/init.d/haproxy start
Starting haproxy:                                          [  OK  ]
If you have enabled the web interface you should now be able to browse to both of your HA Proxy servers on port 8080 and get something like below
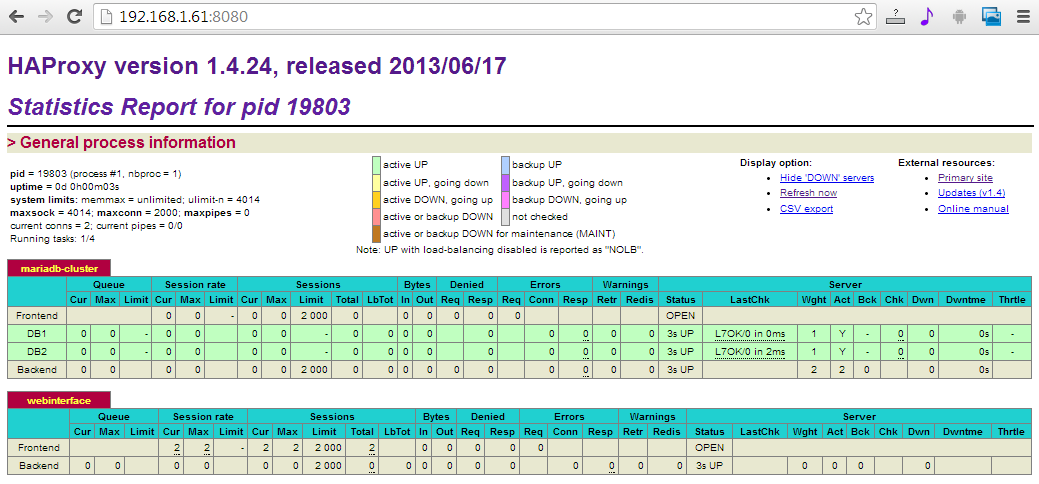
If your servers aren’t shown as up you have an issue that you need to find and correct before you proceed.
The next thing to check is that ha proxy is load balancing correctly by running a mysql query against it to find the node id. You do have to specify the host otherwise it will attempt to use a socket file and just talk to the local pc
[root@DB1 ~]# mysql -u root -h 192.168.1.61 -p -e "show variables like 'wsrep_node_name';"
Enter password:
+-----------------+-------+
| Variable_name   | Value |
+-----------------+-------+
| wsrep_node_name | db2   |
+-----------------+-------+
[root@DB1 ~]# mysql -u root -h 192.168.1.61 -p -e "show variables like 'wsrep_node_name';"
Enter password:
+-----------------+-------+
| Variable_name   | Value |
+-----------------+-------+
| wsrep_node_name | db1   |
+-----------------+-------+
[root@DB1 ~]# mysql -u root -h 192.168.1.62 -p -e "show variables like 'wsrep_node_name';"
Enter password:
+-----------------+-------+
| Variable_name   | Value |
+-----------------+-------+
| wsrep_node_name | db1   |
+-----------------+-------+
[root@DB1 ~]# mysql -u root -h 192.168.1.62 -p -e "show variables like 'wsrep_node_name';"
Enter password:
+-----------------+-------+
| Variable_name   | Value |
+-----------------+-------+
| wsrep_node_name | db2   |
+-----------------+-------+
So now we have Maria DB cluster working and HA Proxy to handle load balancing as well as a failure of a Maria DB node next we need to configure keepalived to handle the virtual IP allowing fail over in the event of an issue with ha proxy.
First step of course with keepalived is to install it and nuke the default config.
[root@DB1 ~]# yum install keepalived -y
[root@DB1 ~]# mv /etc/keepalived/keepalived.conf /etc/keepalived/keepalived.conf.bak
[root@DB1 ~]# vim /etc/keepalived/keepalived.conf
This is the configuration for our first server
global_defs {
        lvs_id LBL01
}

vrrp_sync_group SyncGroup01 {
        group {
                FloatIP1
        }
}

vrrp_script check_haproxy {
        script "killall -0 haproxy"
        interval 2
        weight 2
}

vrrp_instance FloatIP1 {
        state MASTER
        interface eth0
        virtual_router_id 10
        priority 101
        advert_int 1
        virtual_ipaddress {
                192.168.1.60
        }
        track_script {
                check_haproxy
        }
}
The major points you need to change is the virtual IP address and the interface
For each server you must: - Assign it a unique id. Change the line lvs_id to LBL02 for instance - Change the state from MASTER to SLAVE - Change the priority to 100
Finally start and enable keepalived on boot
[root@DB2 ~]# /etc/init.d/keepalived start
Starting keepalived:                                          [  OK  ]
[root@DB2 ~]# chkconfig keepalived on
Once done you should be able to see the secondary IP on the master server
[root@DB1 ~]# ip addr sh eth0
2: eth0: <BROADCAST,MULTICAST,UP,LOWER_UP> mtu 1500 qdisc pfifo_fast state UP qlen 1000
    link/ether 52:54:00:48:68:f6 brd ff:ff:ff:ff:ff:ff
    inet 192.168.1.61/24 brd 192.168.1.255 scope global eth0
    inet 192.168.1.60/32 scope global eth0
    inet6 fe80::5054:ff:fe48:68f6/64 scope link
       valid_lft forever preferred_lft forever
And for the final check you should now be able to do queries against the virtual IP
[root@DB2 ~]# mysql -u root -h 192.168.1.60 -p -e "show variables like 'wsrep_node_name';"
Enter password:
+-----------------+-------+
| Variable_name   | Value |
+-----------------+-------+
| wsrep_node_name | db2   |
+-----------------+-------+
[root@DB2 ~]# mysql -u root -h 192.168.1.60 -p -e "show variables like 'wsrep_node_name';"
Enter password:
+-----------------+-------+
| Variable_name   | Value |
+-----------------+-------+
| wsrep_node_name | db1   |
+-----------------+-------+
Following these instructions you should now have a highly available MariaDB cluster. Note in the real world it is recommend you have at least 3 nodes in the cluster however in our case as I was just testing I only used 2. Adding the 3rd is exactly the same as adding the second.